This post may contain affiliate links. Please read our disclosure policy.

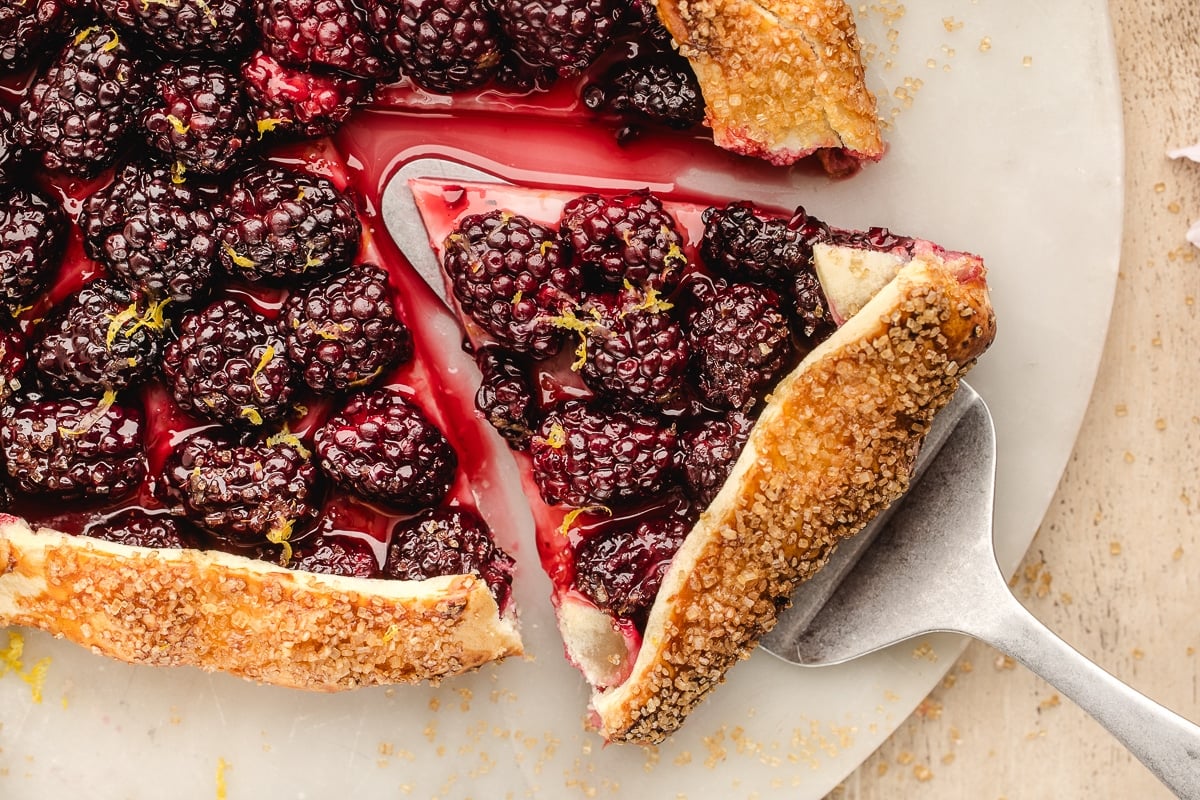
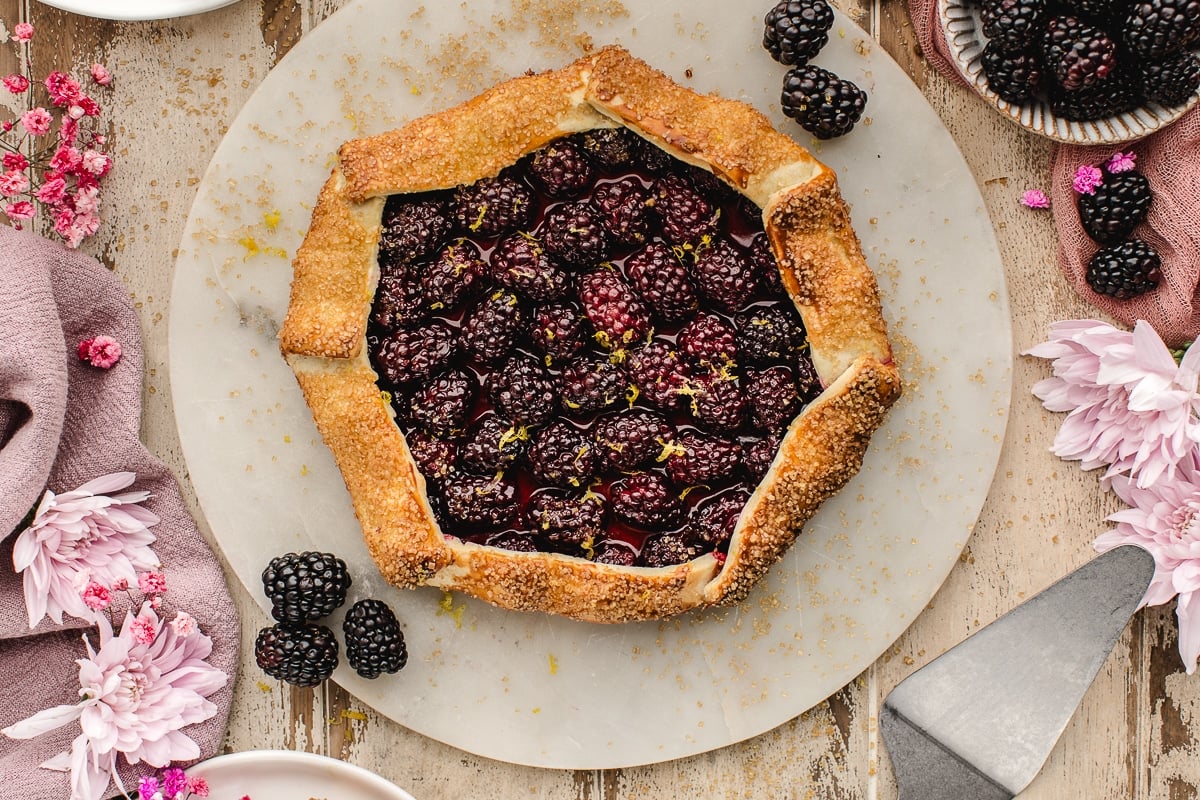
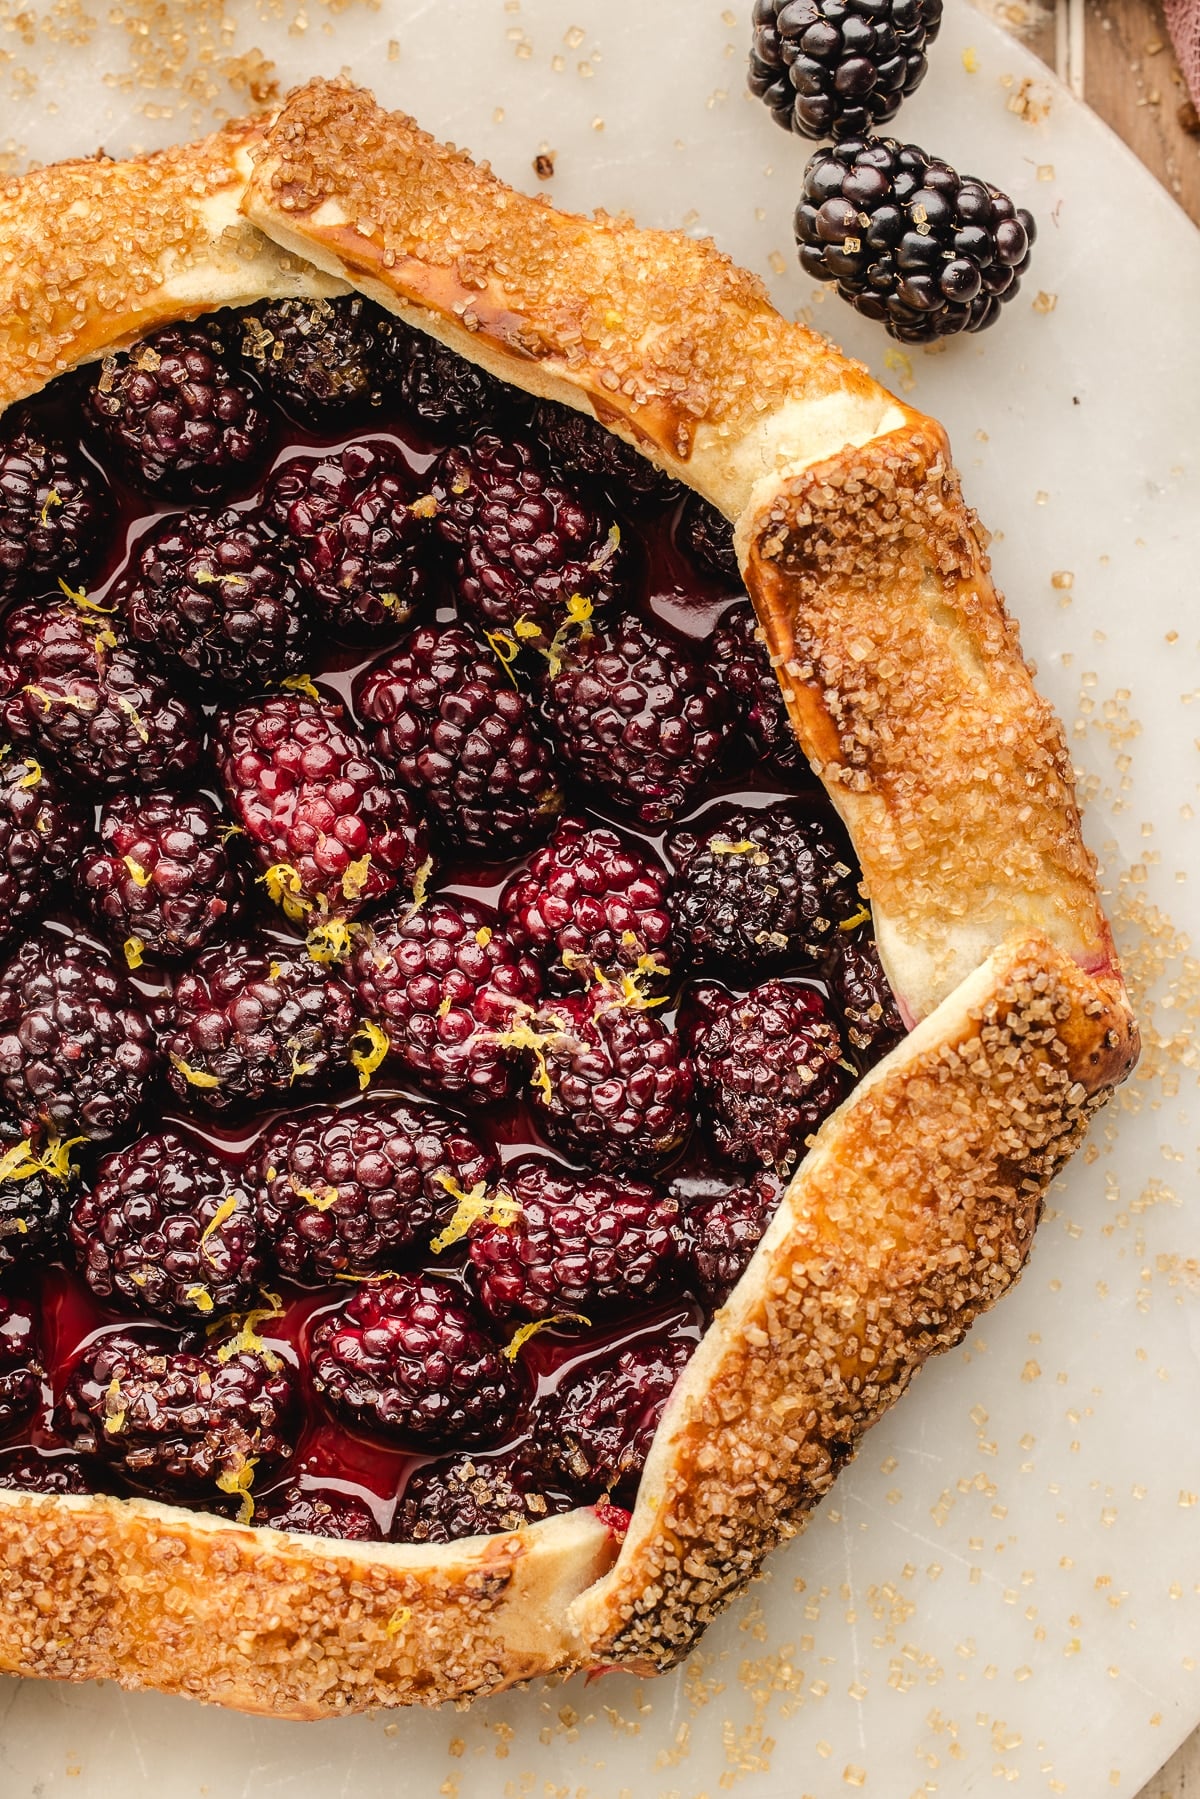
This blackberry galette uses refrigerated pie crust, which means dessert can be on the table in under an hour. Three cups of fresh blackberries, a little lemon zest, a quick fold of the crust, and it bakes up golden and rustic with the fruit bubbling in the center. It’s one of my favorite desserts in summertime because it’s so quick and easy!

Blackberries just might be my favorite summer fruit. Or maybe watermelon is. Maybe as a true-blue American like Jeremiah Dickson, I shall just have them both! And I do, quite frequently!
I like making a galette because I’m a pretty lazy cook, and it’s more forgiving and easier than a pie. There’s no pan to line, no lattice to weave, and no second crust to crimp. You pile the fruit in the middle of the dough, fold the edges up over it, and the rougher it looks, the better. You literally cannot mess it up!
While you can certainly use my easy Homemade Pie Crust, I recommend taking a shortcut here and using the refrigerated pie crust. Skip making, chilling, and rolling the dough, and just go right to making your galette. It’s perfect when you’ve got unexpected company coming and just need to throw something together.
Testing results for blackberry galette
- Fresh vs. frozen blackberries. I tested both and found that the frozen berries released so much juice that the bottom of the crust was soggy. Fresh berries stayed mostly intact, and the crust stayed flaky underneath.
- Cornstarch amount. One tablespoon of cornstarch for three cups of berries was enough to thicken the juice without making the filling gummy.

I hope you make this recipe. I think you’ll love it!

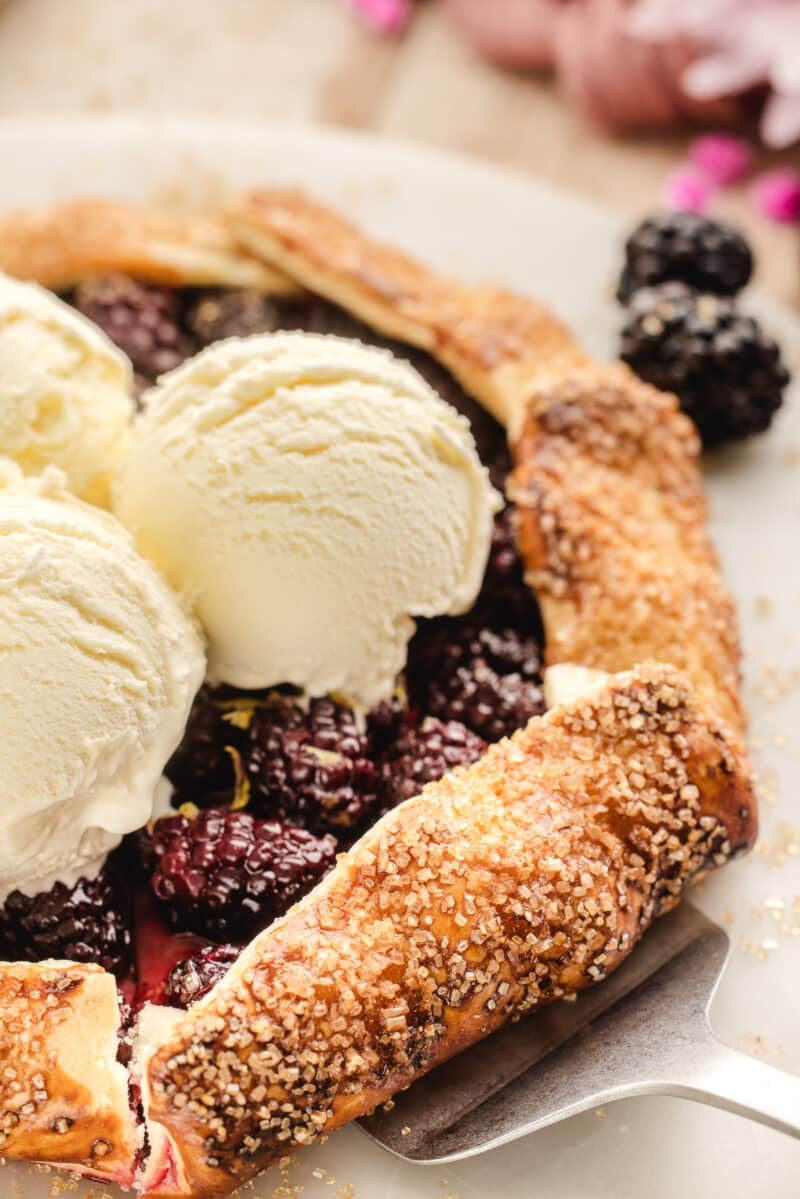
P.S. I serve this galette warm with vanilla ice cream or my Homemade Whipped Cream. If you need a slightly bigger dessert and want to stick with blackberries, try my Blackberry Cobbler — it’s also really easy to make and absolutely delicious!
Ingredient notes
Here are a few things to know about the ingredients in this recipe.
➡️➡️➡️ The full ingredient amounts and instructions are listed below on the printable recipe card. Scroll below the recipe card for frequently asked questions and tips for success.
Fresh blackberries. Use fresh berries, not frozen. Frozen blackberries release too much liquid as they bake, which seeps into the crust and bubbles out the sides. If fresh blackberries aren’t in season, swap to another fresh fruit before reaching for frozen.
Cornstarch. This thickens the blackberry juices as they cook, so the filling holds together when you slice. A single tablespoon is enough for three cups of fruit. Add more, and the filling sets up too firm. And don’t try to substitute with flour because it will just taste like flour and the texture will be gummy.
Lemon zest and juice. The zest carries most of the flavor and the juice balances the sweetness. Zest the lemon before juicing it, because it’s real hard to zest half of a squished lemon. Don’t ask me how I know 🤪
Refrigerated pie crust. Pull it out of the fridge about 30 minutes before you plan to assemble the galette so it doesn’t crack, and it’s easier to work with.
Turbinado sugar. The coarse crystals stay crunchy on top of the baked crust. Regular granulated sugar works in a pinch but won’t give you the same texture or bakery sparkle.
Pin this now to save it for laterHow to make blackberry galette
Here’s how to make this easy blackberry galette step by step.
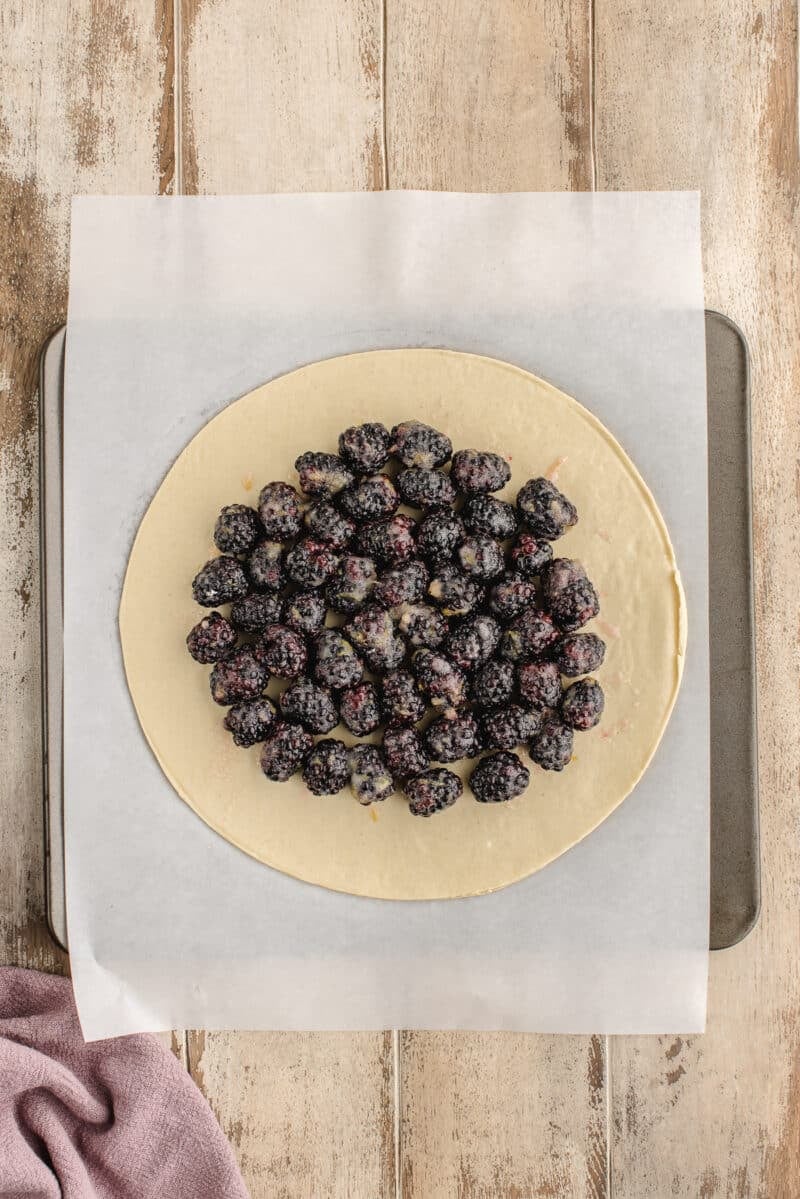
- Toss the filling. Toss the blackberries with the sugar, cornstarch, lemon zest, and lemon juice.
- Lay the crust. Lay the pie crust on a parchment-lined baking sheet and spoon the fruit into the center, leaving a 2-inch border.
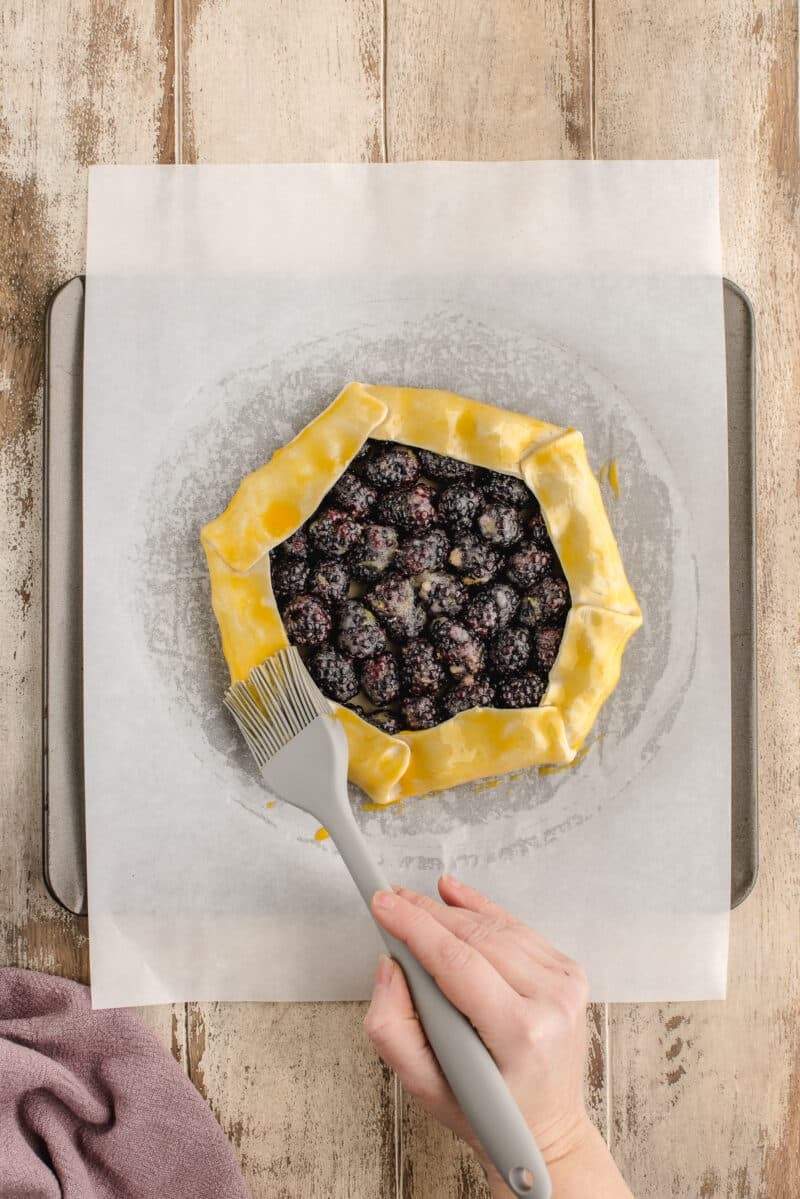
- Fold the edges. Fold the edges of the crust up over the fruit, working your way around the galette and overlapping the folds as you go.
- Brush and sprinkle. Brush the crust with beaten egg yolk and sprinkle with turbinado sugar.
- Bake. Bake until the crust is golden brown and the blackberries are bubbling, then let it cool for a few minutes before slicing.
How to keep your galette from getting soggy
The soft underside is the most common galette problem, and it almost always comes down to fruit juice soaking into the bottom of the crust before the pastry can set. Our best tips to prevent this are:
- Use fresh fruit as discussed above.
- Place a baking sheet or stone in the oven while it preheats. Then place your galette baking sheet on top of the heated one and bake on the lower oven rack. (I use this same concept with my Blueberry Muffins). This will help get the bottom a little more done and crispy.
- Sprinkle fine bread crumbs or cracker crumbs inside the crust to soak up excess juice.
- Brush the inside of the crust with a thin layer of egg yolk.
Variations
- Peaches. Use sliced fresh peaches in place of the blackberries. Add an extra teaspoon of cornstarch since peaches release more juice than berries. For a two-fruit version that pairs both in peak season, see my Peach Blackberry Galette.
- Cherries. Pitted fresh sweet cherries work beautifully. Cut them in half so they release some juice and lay flatter under the crust.
- Pears or apples. Use thinly sliced firm pears or apples. Toss with a half teaspoon of cinnamon along with the sugar and cornstarch.
- Mixed berries. Combine blackberries with raspberries, blueberries, or strawberries to total 3 cups. Mixed berries stack flavor and color in the same bake.
- Individual mini galettes. Cut 5-inch circles from the pie crust and divide the fruit between them.
If you make this recipe, please leave a comment and ⭐️⭐️⭐️⭐️⭐️ below!
Join Southern Food and Fun Community group
and Southern Potluck group!
And please follow us on social media:
Blackberry Galette Recipe

Ingredients
- 3 cups fresh blackberries
- zest of 1 lemon
- 1 tablespoon lemon juice (about half a lemon)
- ¼ cup granulated sugar
- 1 tablespoon cornstarch
- 1 refrigerated pie crust
- 1 egg yolk, beaten
- 2 tablespoons turbinado sugar (coarse sugar)
Instructions
- Preheat the oven to 400 degrees F. Place a baking sheet upside down on the lower oven rack. Line another baking sheet with parchment paper.
- Wash 3 cups fresh blackberries, then blot them dry with a paper towel.
- In a large mixing bowl, add the blackberries, zest of 1 lemon, 1 tablespoon lemon juice (about half a lemon), 1/4 cup granulated sugar and 1 tablespoon cornstarch. Gently mix the ingredients, taking care to keep the blackberries mostly intact.

- Lay 1 refrigerated pie crust out on the baking sheet you prepared earlier. Spoon the blackberry mixture into the center of the pie crust leaving a 2 inch border around the edge.
- Starting at the top, fold the the pie crust inwards so that it is touching the edge of the fruit, keep folding as you move around the pie crust overlapping as you go. Gently press the pie crust on the overlapping areas to secure it.
- Brush the pie crust with 1 egg yolk, beaten and scatter over 2 tablespoons turbinado sugar (coarse sugar).
- Place the baking sheet on top of the upside down preheated one and bake for 35 minutes or until the pie crust is golden brown and the blackberries are bubbling.
- Remove from the oven and allow to cool for a few minutes before slicing and serving with ice cream. Enjoy!


Nutrition
Questions and tips
Storage
Make ahead. Assemble the galette through the egg wash and turbinado sugar step, then cover loosely and refrigerate for up to 24 hours before baking. Bake straight from the fridge, adding a few minutes to the bake time if needed.
Storage. Store leftover galette in an airtight container in the refrigerator for up to 3 days. The crust will soften slightly in the fridge, which is normal.
Reheating. Warm individual slices in a 350°F oven for 8 to 10 minutes. This recrisps the crust and brings the filling back to that warm-out-of-the-oven texture. Microwaving works but leaves the pastry soft.
Yes. Roll a single-crust portion of homemade pie dough out to a 12-inch round and use it the same way. Chill it for 20 minutes before adding the filling so the pastry holds its shape during baking.
The crust should be deep golden brown all the way around, including the folded edges, and the blackberry filling should be visibly bubbling in the center. Gently lift one edge with a spatula to check that the bottom is crisp and golden, not pale or wet.
Yes, use a gluten-free refrigerated pie crust in place of the regular one. Look for brands designed to be rolled and folded, since some gluten-free doughs are too crumbly to withstand the folding step.